
If a photo is worth a 1,000 words, this tutorial post should be worth about 24,000… Here’s a heavy-on-the-pics tutorial for my non-crafty cohorts out there (for my crafty compadres, you could probably look at one or two of these pictures and get the gist–scroll accordingly).

As those who know me might have noticed, I’ve been on a bit of a fabric wreath bender the last few months. Above is the one I did today, the Valentine’s/heart-shaped wreath in this tutorial…
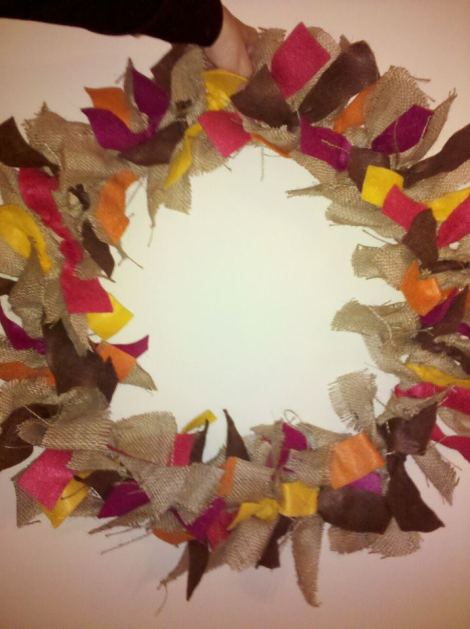
…but there was also the felt & burlap fall one (note the quality photo… it was 2:00 a.m. when I did this one… taking a break from constructing an operational cardboard drawbridge for eight-year-old knight birthday party… ahem, but I digress)…
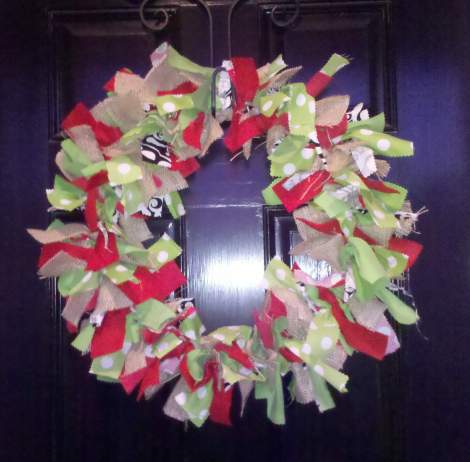
…and then came the fabric, felt, and burlap red & green Christmas one…
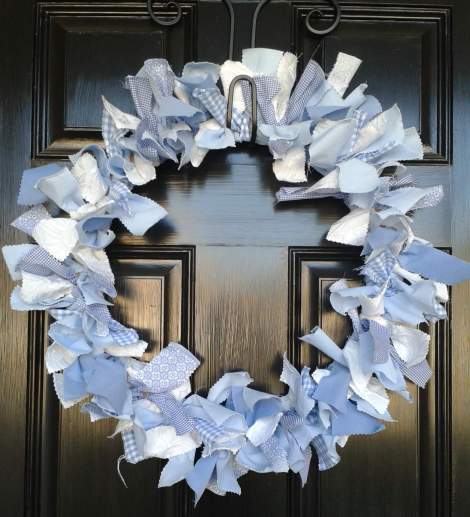
…and the blue and white snowy fabric winter one.
So here we go! Wheee! First you need a wreath form.
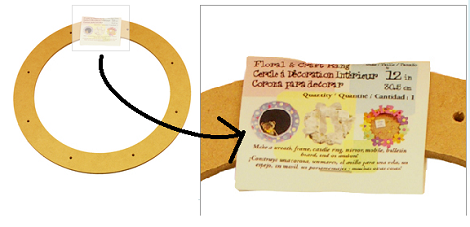
For the Valentine’s wreath, I made my own form, but for the three round wreaths, I used a pre-made wooden wreath form that I bought for about $3 in the wreath form section of my local craft store. It is literally a thin circle of wood. If you are using one of those bad boys, you can scroll down to skip a few steps.
I wanted a heart shape for my Valentine’s wreath, so used a scrap piece of cardboard that I had leftover from an abandoned project (ignore the green lettering). Sketch a heart the size you want your wreath form to be (remember, your finished wreath will be about 4-8 inches wider once the fabric is on it).

If you missed that day in school when they handed out doodling skills, fear not: I find it is easy to draw a convincing and symmetrical heart if you break the image up into fourths… {click on the images to make them bigger}


Voila! Now you have your basic wreath shape! Well done. Take a break to pat yourself on the back and have a cup of hot tea.
Next, cut out your wreath form. Then draw an inner line as a guide to cut out the center of the heart–you will want your finished wreath form to be about 1.5 to 2 inches thick.


Hopefully, you’ll be left with something that looks like this:


{I snipped a few more bits off to shape it here so the fabric wouldn’t have to squeeze in too much}
Then gather your fabric scraps. I happen to have a whole cubby of colorful remnants I chose from, but you can also get some felt uber-cheap (I like the felt squares, even, because they cut into perfect strips so very nicely) or some inexpensive fabrics/scraps… Even upcycle an old table cloth or sheets or whatever. Use any color combo you want (or even do it all one color)! Figure about one fabric strip for each inch of wreath… So if your wreath form is about 100 inches around, you’ll need 100 strips (I used twenty strips each of five different fabrics for this one).
UPDATE: Someone asked how much fabric to buy. Really, it depends on the width of the fabric (it will say on the end of the bolt). Many fabrics are 44″, so if you get 1/3 yard (or one foot or 12 inches), you could cut 22-28 strips from that (1.5 to 2″ width). So if you get 1/3 yd each of four fabrics, you should have the perfect amount for this wreath… does that make sense?


The fabric strips don’t have to be perfect–you can see above right, next to a ruler, how mine vary. Don’t get hung up on all that tedious measuring–just eyeball it! The important thing is that each strip is long enough to easily tie around your form.


Then just start tying strips on (simple single knot, like you’re tying your shoe) until you’ve gone all the way around your form. Easy peasy!
And you’ll end up with this:

Some people stop there, or they flip it over to the back and leave it as a flat wreath, like this:

Stinking cute, but I spent a great many years in Texas, so I think somewhere along the way, the idea of teasing things up to make them bigger got ingrained in me (just be thankful it’s not my hair).
Next, thread a long strip through about where I’ve shown below, and double knot it to form a hanging loop. [Of course, if you are using the circle form, no hanging loop is necessary–you can put it right onto your wreath hanger or nail or whatever.]


Then start foofing (that’s a technical term) by twisting each knot back against itself. [Looking at the below photo, I realized it might be a little confusing: I’m talking about grabbing the piece at the START of the arrow and pulling down or up, not grabbing the random piece I seem to be pointing to. Wups! So basically grab both ends of the red piece in my hand, and twist it back against itself.]

And that’s it! You’re done!

Now hang it on your front door (or wherever!)…
…And do the happy dance!
{Did this tutorial work for you? I’d love to see what you create! Link up!}
*
You might also like these posts…
![]()


Super duper cute! Love it!
LikeLike
I am all over this…will let you know how it goes 🙂 Thank you for such and EASY tutorial for us visual learners. Love it!
LikeLike
Agree with Christina: Great way to learn for VISUAL learners. YOU are a GREAT teacher! I could probably even learn math from you!
LikeLike
I LOVE your Fabric wreath! It’s got such personality and it so textural and fun! Thanks so much for linkin’ up to my Wreath party!
LikeLike
Pingback: {the lowdown on} How To Put Together A Fantastic, Affordable Gift Basket | CampClem·
Pingback: Burlap & Felt Fall Wreath | CampClem·
Pingback: The Five-Minute {rampantly ruffled} T-Shirt Tutorial | CampClem·
Pingback: The Liberating Limitation Of Fabric Scraps | CampClem·
Pingback: Our Christmas Porch… Sort Of | CampClem·
Pingback: Our Christmas Porch… Sort Of | CampClem·
Pingback: Simple DIY Floating Heart Wreath | CampClem·
Pingback: DIY Ruffled Burlap Wreath: Who Knew It Was So Easy? | CampClem·
Pingback: Super-Cheap Owl Jewelry DIY {& crafting with MOPS} | CampClem·
Hey I am so delighted I found your weblog, I
really found you by accident, while I was searching on Digg for
something else, Anyhow I am here now and would just like to say kudos for a
remarkable post and a all round interesting blog (I also love the theme/design), I
don’t have time to read through it all at the moment but I have bookmarked it and also added in your RSS feeds, so when I have time I will be back to read much more, Please do keep up the excellent work.
LikeLike