Here at CampClem, we’ve been heavy on the testosterone for years. And it’s been a glorious, sword fighting, epic battling, dirt digging run, but now we’ve added a girl to our clan, and while my sewing machine is still regularly employed for cape-making and battle-gear-constructing, it has also been put to a more delicate use.
I knew long before she was out of the womb that I would love to make clothes for my little lady. The only problem is this: I’m no seamstress…
But thankfully, some dresses are SUPREMELY easy to make. Now, if you are an iron-down-the-seams & pin-every-line kind of girl, this tutorial is NOT for you… But if you are a we’ve-got-90-minutes-to-git-‘er-done-before-nap-time’s-over gal, you’re in the right place.
Here’s a tutorial on how to get there…
You will need an existing dress, fabric, 3/4″ elastic (enough that if you made a loop/necklace, it could fit over your child’s head), 1/8″ elastic (12-18″ should be ample), scissors, and a sewing machine with thread.
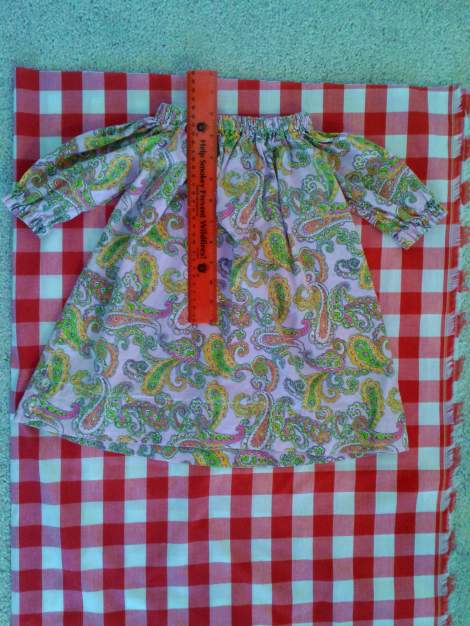
First figure our how much fabric you will need. For my fourteen-month old, I use 1 yard for a short sleeve or half-sleeve dress OR a little over 1 yard (I get 1-1/4 yd and have plenty) for a long sleeve dress. You can figure out your yardage by measuring your existing dress from the top of the neck to the bottom of the hem PLUS top of the shoulder to the end of the sleeve PLUS 8 inches for hems. If you are just starting out, you might want to choose a pattern with random fabric, b/c if you choose something like this giant gingham (below, fabric underneath dress), for instance, and get it cock-eyed at all, it is going to show. Random patterned fabrics (below, like the “existing dress” in this picture, also made with this tutorial) are much more forgiving.
Once you have your fabric (here’s my yard in red giant gingham… “picnic table camo,” I like to call it), fold it in half with the selvage/uncut edge at the right, and lay your existing dress on top of it. You’ll want to cut your fabric straight across under the dress so there are a couple of inches above and below the neck for seam allowance. Then cut it straight up along the selvage edge (right) at the widest width of your existing dress plus about an inch.
And what is left (below left, where ruler is) should be plenty of length for your sleeves–I had about 16 inches of fabric left to make long sleeves (the original dress had half-length sleeves, to elbows). I fold the sleeve fabric in half again so my fabric is now four thick (it’s already folded once from when we began), lay the original dress sleeve over it with the fold of the fabric on the left and where I’m going to cut on the right (below, middle), and cut the new sleeve, adding about half and inch to the width for seam allowance. Then you will have two sleeves (below, right), both folded on the left & open on the right.
{click thumbnails to enlarge}
Now, as an added but OPTIONAL step, you can add a little contrast fabric to the hem. Please skip this step if you are keeping it REALLY simple, like I did for the single fabric pink paisley dress in the photo above. I chose to add small red gingham print fabric to the hemline of this dress, though. Simply fold the accent fabric in half (fold left, selvage right, just like with the dress body), and cut a few inches of it to allow for what you want to show plus seam allowances & hem. I had about 8″ of fabric for about a 4″ accent (I like a really thick hem). ASIDE: A rule of thumb for mixing patterns/fabrics is to use the LARGE print in the large field (giant gingham for the whole body of the dress) and the small print for the small field (small gingham for just a few inches at the hem).
Now you have your body piece & two sleeves… I actually cut my body piece (and contrast hem) right up the left where it’s folded (and then sew it back together in a later step) b/c I can’t handle having a seam down one side of the dress and not the other. Next, cut a “j” at the top corners of the body of your dress (below, left)–these should be big enough to be arm holes plus a couple of inches for turning under later to put the elastic in the neck. It’s not an exact science, don’t worry, but if a measurement makes you feel better, my “j” cuts here are about 6″ tall and 1.5″ wide. Notice the “j” shape (below, right). Do the same thing for the sleeves, making sure to make pretty similar sized cuts (I lay my “j” scraps on the sleeve and use them as a cutting guide–below, middle).
{click thumbnails to enlarge}
Now {hopefully!} you have something that looks like this (or all one fabric pattern if you are not doing a contrasting hem):
If you are adding a contrast fabric hem, attach that now to the body of your dress by sewing right sides together for the dress front pieces and back pieces. Simply sew a straight line along the bottom to join the two fabrics (below, left). Don’t forget to lock your stitches into place by doing a back stitch at the beginning and end of every run–do this for all the sewing steps in this tutorial to lock your stitches into place. You should end up with a dress front & back that look like this (below, right).
{click thumbnails to enlarge}
Next, form the body of the dress by laying right sides together and stitching up the two sides (JUST the straight side parts, NOT the “J” parts–below, left). Then do the same thing to form each sleeve, sewing just along the straight side opposite the fold (bottom, right).
{click thumbnails to enlarge}
Next, sew on the sleeves: turn the sleeve right-side out (leave the dress body inside-out) and tuck the sleeve into the body so the “j’s” line up and the right sides are together (right-side-out sleeve inside inside-out dress–below). Make sure the armpit seams line up–not so important the tops line up perfectly (as you see below).
Okay now, this is the only remotely tricky part of the process, so put down your hot tea and scooch your chair up. Next, you’re going to sew around the “u” formed by the two “j’s” (below, left & right). Remember where the two side seams meet is the place where your sleeve & body “u’s” should line up. Oi, that sounds confusing–I hope the photos help! Just move the fabric gently around the turn as you sew your “u” (bottom, right).
{click thumbnails to enlarge}
Believe it or not, you are almost there!
Now DON’T PANIC! Go get a fresh cup of hot tea and breathe: I know it looks like a weird mumu tube right now. Fear not; it’s all about to come together in the last few steps where what on the left (below) turns into a [long-sleeve, longer length version] of what’s on the right!
Next, finish the sleeves and bottom by turning them under and sewing all the way around, then turning them under again and sewing all the way around (now, if you are a REAL seamstress, I’m sure you’d have a word for me about ironing and pinning and “doing it right”… but I’m not a seamstress: I’m a mom. A mom whose 1-yr-old and 4-yr-old’s nap times will be over VERY soon). I do a thick hem at the bottom… there’s no need to–I just like the look… Here is the sleeve being sewed the second time around (below)–that way the sleeves/bottom are finished edges.
Now onto the neckline. You want your strip of 3/4″ elastic to be long enough–if looped–to stretch over your child’s head, but not so short or so long that it makes the neckline too tight or too loose. See (below, right) how I’ve done a really quality job sewing the ends into a loop? Ha! I just ran my stitch back and forth to make sure the elastic stays together.
Fold the dress/sleeves top of dress over once and sew (just like you did on sleeves and bottom hems), but on the second fold, tuck the elastic under the fold (below, left & middle) and sew around the hem being careful NOT to sew the elastic–you are making a tunnel for the elastic as you go (below, right).
{click thumbnails to enlarge}
Now here’s another DON’T PANIC moment: you will {seem to} run out of elastic loop LONG before you run out of neckline fabric. Just gently pull the elastic (below, middle) to have more. This will cause the fabric to bunch behind the needle (below, right), but no worries because you will continue to have a nice smooth run of fabric and plenty of elastic loop to continue folding and sewing your tunnel.
{click thumbnails to enlarge}
Lookie there! It’s actually looking like a dress now! Yippee! {On a side note–in case you happen to notice–I decided to turn up the hem a little more after this photo to shorten the dress a bit–it was a little long.}
Last step: sew elastic around the sleeves! “Measure” the 1/8″ elastic by stretching it taut across the sleeve (below, left), then double that length to go all the way around–err on the side of cutting it a little long–it’s easy to snip off any extra after it’s sewn on. Then sew it along the inside hem of your sleeve, starting (at the seam) with a stitch or two and a back stitch to secure the elastic to the sleeve before you start stretching it, then stretching it for the rest of the way around.
And that’s it! Voila! I know it seems like a ton of steps, but it literally took me four times longer to type this tutorial than it did to make the whole dress!
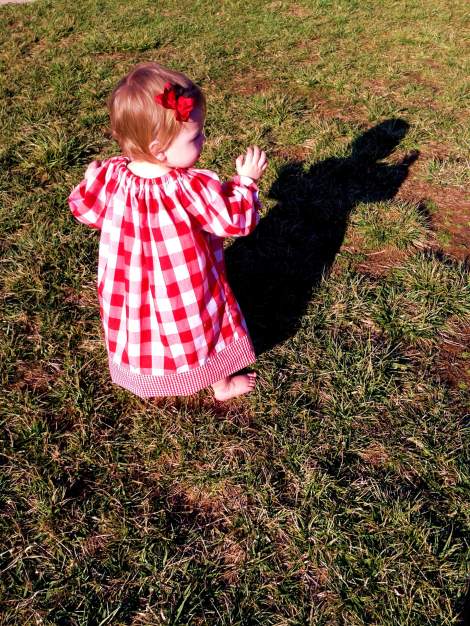
Of course, the hardest part of this dress… is getting my VERY busy model to pose for a pic!
Can’t wait to see what you come up with! Let me know if this works for you!


Ok….I have the tutorial…now I just need the girl! 🙂
LikeLike
Pingback: Fast, Easy, Stinkin’ Cute Ruffle Pants {Free Photo Tutorial} « CampClem·
thanks for tutorial.
LikeLike
Pingback: Sissy & Babydoll {just love to coordinate} | CampClem·
Thank you so much for this tutorial. I taught myself to sew about six months ago, and of course I’m still learning. I searched the internetnon a tutorial that actually made sense to me and seemed possible, and luckily, after reading over ten or fifteen tutorials, I found yours. It is the best one!! The dress that I made is so cute! Thanks soo much!! 🙂
LikeLike
That is an awesome compliment!! Thank you!
LikeLike
Pingback: Adding Fun Details To A Simple Tunic | CampClem·
Pingback: Spring Ready Mixed Print Peasant Dress | CampClem·
Pingback: Cabbage Patch Remix – Shades Of Tangerine·