
Okay, so I jumped on the turkey shirt train and just had to add my own creative solution to improve on it!

This is SUCH an easy little sewing project–I can’t believe I hadn’t done a turkey shirt before!

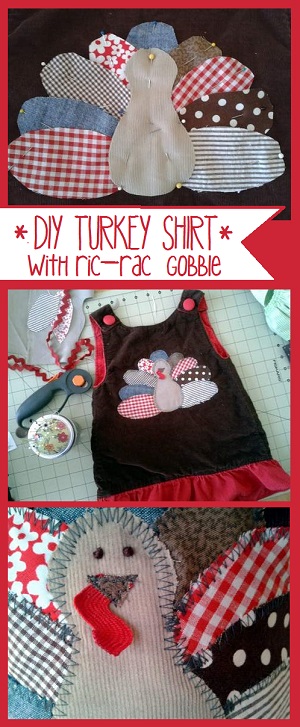
It’s literally as simple as cutting out several ovals (feather plume) and one peanut/pear shape (body). I decided to add my turkey to a red & brown corduroy jumper I made last year, so I chose red, blue chambray, and brown scraps for the feather ovals and a tan cord for the peanut/pear body.

Once you are happy with your feather order and turkey placement, use a few pins to secure everything in place. Use one pin in the end of each feather and five-or-so pins to secure the body (and other ends of the feathers). I didn’t take any fancy steps to prepare me fabric–just cut and sew. It will fray around the edges just a smidge in the wash, but then this will cute li’l turkey look even BETTER, huzzah!

Then head to the machine! Use a zig-zag stitch to sew everything right in place. If you are using a t-shirt or other stretchy/jersey fabric, make sure not to pull and contort or twist your fabric as you go. You can pull out the pins as you get to them, or sew right over them and then pull out the pins once you’re done. Start at the base of one feather, back-stitching to lock your thread as you begin (and end), and sew to the end of that feather. Then lift your needle and move on to the start of the next feather (or where it peeks out from under the last feather) and repeat, locking your thread at the beginning and end of your stitch. Repeat until you have sewn around the showing edge of each tail feather. Then sew all the way around the peanut/pear body.

For the face, you could add a simple embroidery floss beak and eyes, maybe something like Cottage Mama Lindsay’s choice, but I chose to cut out a bitty little triangle from brown fabric. But what to do about the gobble?? Inspiration strikes: a bit of medium ric-rac would offer just the right curve! Just heat seal the ends (I passed a lighter quickly over each end). I tucked the ric-rac gobble’s end under the little triangle fabric beak and did a small zig-zag stitch around the beak triangle. I left the gobble to dangle.

GAH! I love! So cute with its little gobble dangling! 🙂

Finally, I added eyes with embroidery floss: I pulled through the knotted off thread from the back just like a regular stitch, but then I knotted it on the front side one time before passing the needle back through close to the original hole and tying off in the back.

And, she looks so cute in this turkey shirt that I could–wait for it–GOBBLE HER UP!! 🙂

Sis approves!
Hmm… next month, snowman shirt?? Wheeeee!
*
You might like…


Pingback: Super-Cheap Owl Jewelry DIY {& crafting with MOPS} | CampClem·