
Well, I held my breath as I let Sis choose some heavy satin and yards of tulle. [Satin fabrics are notoriously temperamental, and I usually turn down friends’ pleas to alter formal gowns.] BUT, I have a little princess turning four on my hands–what’s a mama to do when the ready-made princess costumes and dress-up clothes simply will not do?! So, with my typical get-tangled-up-just-tango-on philosophy, I forged ahead. How hard could it be?

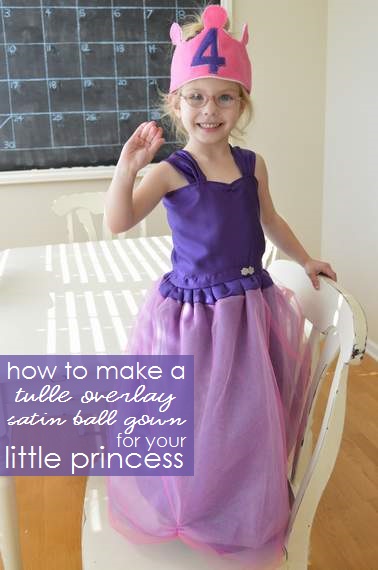
So here’s how I turned a $10 pile of fabric (and no pattern or plan) into Sis’s four-year-old princess party dress…

So, first I cut off a strip of the satin about 18″ long and wide enough to wrap around her torso (plus seam allowance). I folded under the two ends, then folded the top under and hemmed the two sides. I held this “bodice” piece around Sis to see how wide it needed to be, then temporarily pinned it together until it is sewn to the skirt piece.

Next I added a loop of elastic near the top of one end (for a button to be added later).

Sis and I chose a perfect couple of sparkly, blingy buttons.

[If this were going to be an Elsa dress, these snowflake shaped rhinestone buttons would have been PERFECT!]

Next, I took the rest of the satin fabric and sewed it right-sides-together up one side to form a tube. and I layered three pieces of tulle on top of each other and folded them in half, then sewed along the open side opposite the fold to form a tube with those too. [These are turned on their side to form the skirt overlay later, so I had six layers of tulle with a “tulip hem” at the bottom.]

[Here’s a closeup of the tulle–I used a zig-zag stitch.]

Next I wrapped my tulle overskirt around the tube skirt, leaving about 4-5 inches of satin tube at the top, both right sides out. I folded the satin tube back over the tulle seam all the way around the skirt.

I pinned that in place and moved to my machine…

…where I sewed the waist all the way around (with the tulle seam sandwiched inside.

So when that satin tube was flipped back up, I had a nice clean look to the waist of my dress.

I tucked the right-side-out bodice tube into the inside out (and upside down) skirt so that the bottom of the bodice lined up with the top of the skirt. I pinned the two together. There is more skirt width than bodice, so the skirt gapes here, but I finger gather the skirt as I go in the next step. [I think this is the simple method, but if this is too tricky, you can always run a basting stitch and gather the skirt fabric to the bodice width and then pin.

Hand gathering as I go, I bunch the skirt fabric along the flat bodice fabric and sew the two together with a straight stitch.

So now the skirt is attached to the bodice. At this point, I decided the bodice was longer than I liked, so I tucked the extra fabric back into the skirt and pinned it in place.

It forms a lovely “belt” look as it wraps over the hidden seam of tulle and skirt.

I added a short basting stitch and gathered an inch or two at the neckline to form a sweetheart neckline. The next “measuring” I did was to add the straps.

Two strips of fabric were sewn right sides together to form tubes about 18″ long x 5″ wide (a lot of excess length was trimmed later). I finger-gathered the straps to the inside front of the top of the dress bodice and attached them with a row of straight stitches.
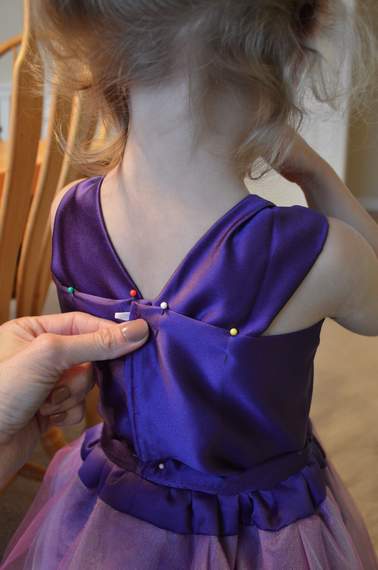
So when I tried the dress on again, I could pin where the straps needed to be attached in the back. More pinning.

I took the pinned dress back off Sis and sewed it up! The bodice was shortened by sewing around the pinned perimeter of the waist and forming the faux belt look, and the straps were attached with a straight stitch to the back of the bodice.

After that was done, I was almost home free! The bottom just needed to be hemmed.

Oh yes! AND to add the BLING!This button was added to the back. [I also added a couple of hidden pieces of velco sewn along the back opening so it wouldn’t gape.]

And a pair of same-but-smaller buttons were added to the “belt.”

Once the satin skirt was all hemmed up, I ran a short basting stitch on the front left and right bottom of the tulle overlay skirt. This gathered it just perfectly, gave a peek-a-boo to the satin underskirt, and swagged in just the most princessy regal way. [I forgot to take a proper shot of that step, but you can see the gather here at the bottom of the tulle skirt.]
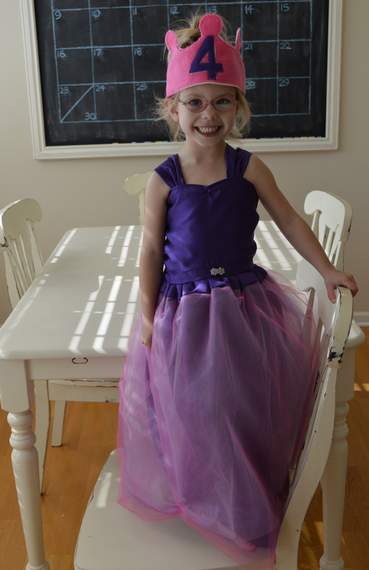
And that was that! Somebody just pinch me at the cuteness.

I am shocked, actually, and so excited about how this turned out. Who knew it was so do-able?!

Of course I just KNEW she would wake up birthday party morning and refuse to wear it…
BUT SHE DIDN’T BALK, HUZZAH!

She loved it…

…all through her princess party…

…And right on through the rest of the day! WIN!!
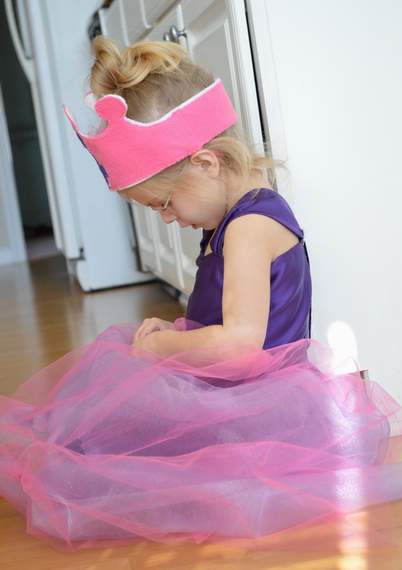
[I just loved seeing her sit there in a puddle of tulle, playing away.]
Oh man, THIS is totally the joi de WHEEEEEE!
And pssst, P.S.: the DaySpring (in)courage Everlasting Light Collection winner will be announced here Wednesday, so don’t miss it!


Pingback: How To DIY Hello Kitty Princess {or any other} Invitations | CampClem·