
If you enter “hex nut bracelets” into the search box on Pinterest, you’ll come up with a gazillion pins. And recently, I was checking them out as a possible craft to do with a group of girlfriends. So here are my findings on the good, the bad, and the tweaks of hex nut bracelet making…

I chose to create this braided style (on the left) and this macrame style (on the right). [Click here or photo to see these pins over on Pinterest.]

Perhaps my favorite part of this craft was shopping for the supplies at the hardware store. That’s my happy place!

I spent just under $16 total, but that bought me enough supplies to make gobs of bracelets. The mason twine was $3.48 for a 250-ft roll. The jute twine was $2.28 for a 190-ft roll, and the hex nuts were $4.58 for a 100-ct box (I got two boxes, so I’d have plenty in case I ended up doing this craft for our girls’ night… but I did the felt flowers instead). The twine came in a few different colors, but I thought the neon pink would be a fun and sassy option. String, hemp twine, or leather cording would be good options, too. And brass nuts are great, too, but they cost more.
The thing I noticed about every hex nut bracelet on pinterest is that they were lacking in the closure department: they either had no closure at all, as with the two I pinned (I guess you just tie them on?), or they had a bought, metal closure (that does not fall into my cheap or free budget quite as well!). So I’ve included a simple free closure how-to with each of these bracelet tutorials.
BRAIDED HEX NUT BRACELET {WITH LASSO CLOSURE}:

Forming this braided bracelet almost couldn’t be simpler. I used two pieces of twine, one twice as long as the other (the shorter piece needs to be the desired length of your finished bracelet plus a couple of inches–so enough to fit around the widest part of your hand plus a bit).
To start it, I folded my long piece in half, and tied the short piece and the fold of the long piece in a knot to form a loop at one end.
To hold the end of the bracelet in place while you braid, you can use a clipboard or bit of blue tape.
When you get about 1/3 of the way through your braid, start adding a hex nut to each strand as you braid. It’s that simple. Then, when you get to the end of your braid, tie it off, and trim the ends so they’re even.

To form a simple closure for your bracelet, thread the entire length of the bracelet through the looped end forming a noose/lasso at the loop end.

Then thread the loose end just a little bit through the lasso. Cinch the lasso, and you’ll have an adjustable sliding knot over the knotted end of your bracelet.

Okay, so that’s the braided hex nut bracelet done (#1 above). #2 is just a plain jute braided bracelet, and #4 is a non-DIY wedding gift from my awesome sister-in-law. 😉 But let’s move on to #3!
MACRAME HEX NUT BRACELET {WITH MACRAME CLOSURE}:

For the macrame hex nut bracelet, I grabbed four strands, two of pink mason twine and two of jute twine. [Really, you could use all different colors if you wanted to–it’s up to you, wheeeee!] The two strands for the middle need only be long enough to wrap around the widest point of your hand + a little bit, but the two knotting strands need to be longer. I cut mine ridiculously long–like 3 feet–for this trial run because I had plenty of supplies and because it’s always easier to trim than it is to add on length!
Once your ends are knotted together and secured (using clipboard or blue tape to hold while you work), start square knotting/macrame-ing the two outer cords around the middle two.

Fellow Brit Kate over at Mini-eco has a brilliant photo tutorial for how to do these macrame knots for a bracelet, so hop over there if you need help (click her photo above for the jump), then come back here for the closure how-to and other tweaks. [But do remember to start with about 3″ tails rather than two closed loops as she shows.]
Once you’ve knotted about 1/3 of your bracelet, start adding the hex nuts by sliding one onto the middle two strands between each knot. So it will go nut-knot-nut-knot-nut-knot-etc. until you have the desired number of nuts added. I added four nut-then-knots, then did three knots in a row, then went back to nut-then-know for another four nuts before carrying on with just the knotting to finish.
Once you get to the end of the bracelet, knot it off about 3″ from the end. [You can see if you need to trim off any extra length at this point by making sure it will wrap around the widest part of your hand + and inch or two for end-knot allowance.]

To form a closure using the same knots you used to make the bracelet, tie a knot in each end of the bracelet, overlap the strands in opposite directions, and add another piece of twine/cord wrapped around them and knotted about five or six times then tied off to secure. Now your bracelet will slide open to slip on or slide closed around your wrist. Huzzah!

So you can slide the ends of your bracelet back and forth through the knotted part to adjust the width and slide it on and off your wrist.

THE GOOD:
I love that these are cheap, easy, fast, and can be done incorporating any number of colors.
THE BAD:
1. Like any lopsided weight bracelet, the hex nuts twist around to dangle below your wrist rather than looking all pretty on top of your wrist like in all those pinterest pins.
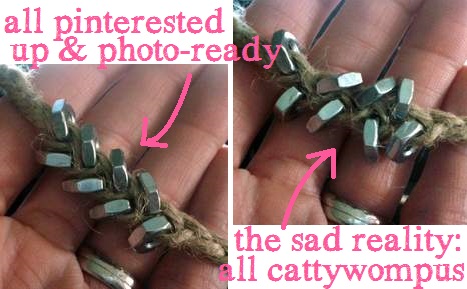
2. With the simple braided style, all the pictures you see have the nuts lying all nice and in the same direction, but in reality, there is nothing to stop them flopping about all cattywompus.
3. It all felt a little too campy to me… I was having flashbacks to friendship bracelet braiding at girl scout camp… And I wonder if these are something I’ll ever actually wear?
THE TWEAKS:
1. Add a closure! [The noose or the knotted sliding closures described in this post are both good options.] I don’t know why all those pinterest pins don’t have one. Am I missing something??
2. A great solution to “the bad” #1–the lopsided weight–would be to weight the back of your bracelet by threading extra hex nuts onto your bracelet’s loose strands before making your closure.
Anyhoo, I hope you found this foray into hex nut bracelet-making useful. Happy pinning! Happy crafting! And wheeeeeee!
So, have you tweaked any Pinterest pins to make them work better for you? Do tell!


