
Confession time: My half of the closet floor usually looks like it was struck by a shoe-nami.

Total disaster.

Thankfully, I can take a cue from my husband, who keeps his shoes neat and orderly. And he was all about working out shelf money in the budget for my shoes. Gracious, I do love that man!
TIP ONE: Preshop online.

And since I have more than a few pairs, we looked into shelving options. Boy, some of the choices out there are PRI-CEY! We found these online (picked up in store same day) at Walmart for $9/shelf (each shelf was 3′ long and included all the hardware and mounting brackets). We had to go to a second Walmart to get the total we wanted (5), but they were $3 more each for the exact same thing at a different local Walmart. Huh? They price-matched for us.
TIP TWO: Love your level.

The trick is to level level level. [And if you don’t have one, go get one! I was shocked to find out this past year that a 3′ level is under $10. What have I been doing all these years?] Level side to side (shown here), back to front (so your shelves aren’t tilting), and shelf to shelf (so there is a nice even line when you stand back and look at them, not all wonky an inch this way or the other). The shelves are easy to install, a one-man (or woman) job…
TIP THREE: Gather your supplies.

Few things drive me more crazy than having to go back and forth grabbing tools for a project, so take a moment, read the directions, and grab everything you need. Oh! And go ahead and charge your drill battery while you do it, because getting all set and measured and then having no juice in your drill can make you a little loco. Not that I’ve ever experienced that… *twitch*twitchtwitch*
Of course, having a few trusty assistants along the way to hand me out-of-reach bits and pieces was awesome! Sissy handed me the stud finder when I asked for the level… but alas, she’s only two. Our five-year-old was extremely helpful handing me things, and he loved being able to do tool stuff.
TIP FOUR: Maximize shelf space.

If you use shelves with brackets (these were way less expensive than the adjustable shelves that hung on wall brackets just at the back), make sure you place your brackets so they don’t obstruct space under the shelf. I spaced mine one shoe width from each edge, so a pair of shoes could flank the slanted bracket. [On some other shelves we installed in our closet, we spaced the brackets far enough from the edge to accommodate a stack of shirts/sweaters.]
Also, if you have heels, you will want to place something across at least the back portion of the shelves so the heels of your shoes don’t fall through between the wires. I love a thin sheet of clear acrylic, cut to size. It’s pretty inexpensive for a big sheet, and you can cut it yourself or have it cut at the hardware store–just blue tape off the line you are going to cut so it doesn’t cut jaggedly (but you can smooth a rough edge by running a lighter or kitchen butane torch along it).

And once the shelves are up, let the sort begin!
TIP FIVE: Keep, Sell, Give, Trash

It’s a great chance to let a few [or a lot of] pairs go. I mean, really, when was the last time you wore those? Send ’em on already! If they’re in good condition, you could pass them on to a friend, donate them to a charity, or even consign them. You know the pairs you’ve forgotten about and never wear; put them straight into a box or bag so your eyes don’t trick you into thinking you might want them or “need” them one day. If you don’t love them now, let them go. They’re just baggage taking up space in your life.
TIP SIX: Have a plan.

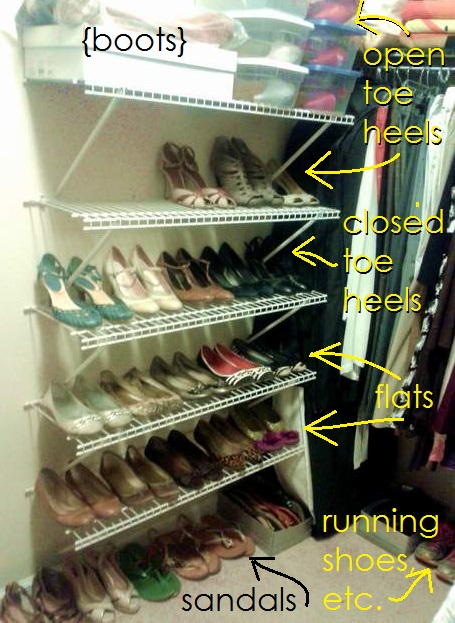
Taking into account the season, put the shoes you wear most often where they are easiest to reach. We’re supposedly in spring around here… but I rethought all those open-toe shoes for now and just put out mostly closed toe ones. I’ll switch the shelves around once warm temps hit!
The point is, have an organization plan that works for you.
TIP SEVEN: Use photo labels.

Take a photo of each pair of shoes. Above are three possible shoe poses, but choose one that makes it easy for you to identify the pair of shoes. Then print out the photos small enough to fit on the end of a shoebox, but large enough to easily see (a standard 3.5 x 5 works great). Attach them to the ends of shoeboxes for those out-of-season shoes you are storing. For me, out of sight is out of mind, so this visual cue helps me find shoes quickly even when they are not out on the shelf (but rather under the shelves, on top of the shelves, or under my long hanging clothes). [Clear bins also work great, and you can get clear shoebox-size plastic tubs for $1 several places–a few are shown on the top shelf below, holding open toe shoes.]
TIP EIGHT: Tweak as needed.
If you find that your system isn’t working as well as you’d like, don’t throw in the towel. Certain shoes might work better, you will find, in certain spots. For instance, if you wear your two or three favorite pairs of shoes almost every day (me: guilty), you might want to keep them on the floor under the shelves–facing in instead of out–so you can slip them on and off quickly and easily without having to “put them away” on a shelf. Convenience is great support beam to successful organization!
WHEWF! Well, I must admit that hubs and I were a little nervous that these shelves would make the closet look and feel smaller, but it actually looks a ton bigger now thanks to the shoe-nami being gone!
AND I got on such a kick that I cleaned and tidied and sorted the whole closet… I went ROYGBIVin’ mad on all my clothes. I’ll have to show you tomorrow! ‘Til then, campers!
*
You might like these posts…


Pingback: My ROYGBIV-ed closet… {and a spiritual question} | CampClem·
Pingback: Hot Tip: Maximizing Closet Shelf Versatility | CampClem·
Pingback: Making Jewelry With Sis {and bead corral tip} | CampClem·