Do you ever talk to your Pottery Barn catalog? Not like have a long, drawn-out conversation or anything, but a definite discussion. You know, like, “Seriously, you want me to pay THAT much money for some tin & old wood? Nuh-uh, honey child, not in my world.”
But–oh–it has that lovely rustic-meets-clean-lines look I do so adore (these two pics from Pottery Barn website)…
Then you think to yourself I could totally make that.
And look! Thanks to a dear girlfriend, I had one of these little lovelies in my garage. Just look at it, about to burst with kinetic creative possibility.
{Now don’t tease: one person’s dirt is another’s patina.}
Plus, I got to employ my boys, even giving the older one a go on the jigsaw. Now that’s just good boy fun right thar. Here’s Big Bro disassembling the pallet. We decided, in the end, to jigsaw off the ends and just pry up the middle (more sawing, less work: it’s a win-win). Then we just measured and trimmed three equal lengths of pallet wood (our herb trough would be all wood, no metal). We trimmed down two pieces to be a little less wide (or “tall”) for the sides, and we used one of those trim pieces for the handle. The other untrimmed piece, we used for the base.
Then I pencil-sketched the curves on the end–starting at the height of the side pieces and finishing at the handle width–and jigsawed those.
Once Big Bro & I had most of the pieces cut, Li’l Bro helped us do a dry fit.
THEN the pieces got loaded into the back of the boys’ gator and put away because it was about time for Sis’s nap to be over…
That was August…
And here it is once I finally got it screwed together …in early NOVEMBER.
{Um, yeah, you other mamas out there get that, right? Life with three little people is full.}
Then it went back into the garage…
…Until the day after Thanksgiving, when it finally gained employment (along with a fabric scrap wreath–easy tutorial here–and tomato cage topiaries I saw on pinterest here).
I gave it a quick stencil, tied extra fabric scraps to the handle, then added juniper clippings to the trough (later).
But now Christmas has come & gone so…
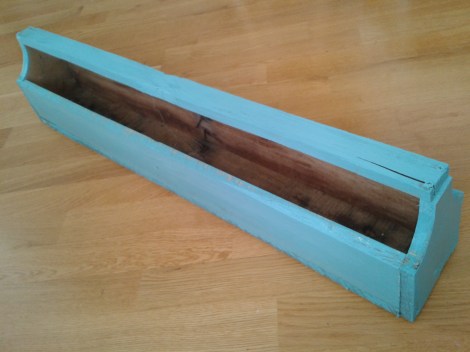
I mixed up some paint (it’s close to Apple Barn Crystal Blue, just a little toned down) and slapped it on. Use a bristle brush on this; a foam one would just get shredded on the rough wood.
I glued some felt bits to the bottom (so it doesn’t scratch surfaces), and this little dandy’s going on our dining room table. Wheeee!!
So what will you make… and remake… and remake again?
featured at


Love. it. !!!!!!!!
LikeLike
Oh, I like this one!!! Feeling inspired.
LikeLike
Pingback: Our Christmas Porch… Sort Of | CampClem·
Pingback: Our Christmas Porch… Sort Of | CampClem·
Pingback: Rearranging The Top Of The China Cabinet | CampClem·
Pingback: Inspiration & Links: {my favorite ways to} Decorate With Wheat Grass | CampClem·