
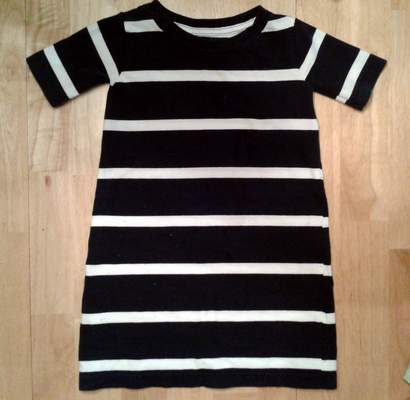
Okay, Sis just scored a totally cute DIY cinched waist dress. This shirt is was an Old Navy boys medium striped t-shirt.

But I decided to remake it into a dress for Sis rather than handing it down to Li’l Bro.

First, turn the shirt inside-out and lay it out flat.

Use an existing shirt as a “pattern,” lining up the necklines and shoulders.

Adding about 1/2″ for seam allowance, cut off the big shirt sleeve following the curve of the sleeve from the existing shirt. This will make your shoulders the correct width and the arm openings the right size. [I’m using a self-healing cutting mat and rotary cutter, but you could use scissors.]

Then, using a straight edge or ruler, cut the side of the shirt off from the new armpit down to the bottom hem of the shirt. Angle your cut out towards the edge, so the dress is slightly A-line.

It should look something like this.

Repeat those two cuts (armpit & side) for the other side, and you’ll end up with this.

Next, set the body aside and grab the sleeve scraps. Cut the curve of the new sleeve the same as the armpit holes, then straight to the end of the sleeve. Repeat with the other shirt sleeve scrap to form second dress sleeve.

Now you have three pieces: the body and two sleeves. Sew up the sides of the dress, leaving the arm openings open, and sew up the bottom of the sleeves, leaving the arm openings open. Note: do not attach the sleeves to the dress yet.
Then, to attach the sleeves, turn a sleeve RIGHT side out, and tuck it into the opening of the INSIDE-OUT dress body arm opening, so the sleeve and body arm opening seams line up. Sew all the way around the opening to attach the sleeve. Repeat for the other side.
Turn the dress right side out, and it will look like this.
You could totally leave the dress like this, a cute little t-shirt dress, but I decided it wanted a little nip in at the waist…

So placing my existing tee on the newly made dress, I marked about where I wanted the waist to fall.

Then I folded the shirt up to the point and sewed all the way around about 1/2″ – 3/4″ from the edge. This forms the channel that we will later pull our tie through.

Fold the dress back down and sew around again catching the bottom of the channel inside the dress through the top layer.

This step isn’t really necessary, but it does make a nice finishing detail.

Next, with a small scissor snip or using your seam ripper, make a small slit right in the front center of your newly sewn channel, making sure to only cut through the top layer.

Thread ribbon or string or a skinny length of fabric though the opening, around the dress, and back out the front from the other side. I used a bodkin to easily pull my tie through, but attaching the ribbon to a safety pin would work too, in a pinch.

To make my drawstring tie, I spiral cut a scrap sleeve from another project and stretched it out to curl the edges and lengthen. [The hem of that sleeve and extra sleeve fabric I used to make two little flowers and a headband to which to attach them.]

Gah, so cute! I love the contrasting color, but you could use the extra side scraps from this shirt to make the tie too.

[These two little flowers sewn onto this sleeve-scrap-turned-headband is a nice coordinating accessory. Hooray!] 🙂

And here’s the happy model doing her best NOT to stand still so I can take a photo! [Stinker!] The jersey makes this a totally comfy, easy dress to wear, and Sis loves it! YAY!
So, now I want to do a grown up version for me for summer! Maybe with an adult XL or XXL tee? Wheeeeeeee!
*
You might also like…


This is my absolute favorite tutorial thus far! LOVE IT! I can’t wait to give it a try! And with the longer sleeves, a perfect dress for fall!
LikeLike
What stitch do you use for jersey knit fabric?
LikeLike
Just a simple straight stitch, set at medium length and tension. 🙂 Wheeeeee!
LikeLike
cute cant wait to make one for my daughter
LikeLike