
Welp, I must admit that my day was pretty much made when a friend–not knowing I’d just DIY’d this–gushed over my shirt… And then said, “I want one!” when I told her how [easily] it came to be. Yay!

This “new” top is the result of seeing a new possibility for a couple of my old tees.

I went through a long phase in my life when I pretty much only wore white tops… [I basically opted out of fashion altogether.] In college it was white t-shirts… Then for a few years, white sleeveless shirts… And more recently, white long sleeve tees. [I still wear a white cami pretty much every day as a layer, go fig, old habits die hard?]
And I still have several of these long sleeve t-shirts in my closet, more than a normal sane person might need, like six or eight of them I think. It was time to breathe a little life into a couple of them. So I grabbed two of them… and my scissors.
Wanna make one too?? Follow along! 🙂

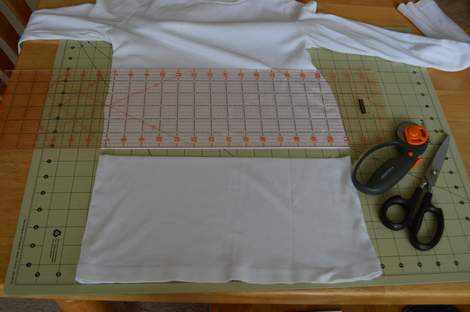
On the first shirt (henceforth refered to as shirt #1, the first of two pretty much identical shirts), cut two slits up the front about two inches from the side seams, seven inches tall.

Then flip up the front flap that those cuts created and cut off the rest of the shirt sides and back (so the bottom seven inches of the rest of the non-flap portion of the shirt).
Put shirt #1 aside and grab [duplicate] shirt #2. Cut about 7″ off the bottom of that shirt all the way around. Then cut off one side seam to create one wide 7″ tall strip.

Next cut two 4″ tubes from what is left of the body of shirt #2, then cut off one side seam from each of them to create two wide 4″ tall strips.

So shirt #1 is at the top. Sew the two 4″ strips from shirt #2 end to end, right sides together, to form a super long strip (middle). And sew the 7″ strip from shirt #1, cut in half (to even out where the final seams will fall), right sides together, to the 7″ strip cut from shirt #2 (bottom). [The reason I cut shirt #1’s 7″ strip in half is so the seams were balanced, two on the left, two on the right, and one in the middle… This is not necessary… But it’s a nice detail.]

Then layer the 4″ and the 7″ strips, both right side up, and sew them together, pinning the 4″ one gathered a bit to be the same finished length as the 7″ one.

Now all that is left is to attach the double ruffle fabric back to shirt #1.
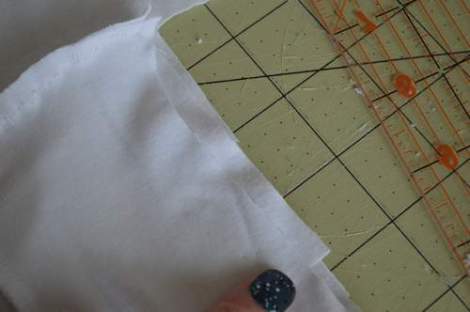
Lay shirt #1 flat and line up the edges of the long double ruffle (face down) and the shirt panel (face up).

Pull the ruffled fabric a little tall so it can be attached about 1/4″-1/2″ taller than the shirt panel. [That way, it will have seam allowance to attach the ruffle to the body of the shirt in a later step.]

Make sure the bottom seams line up.
Lastly make sure the 4″ ruffle lines up too so it will be sewn to the panel evenly and without bunching.

Once the double ruffle end is sewn to the shirt panel, it looks like this (when you flip it to right side out).

Repeat the same lining up check for the other end of the double ruffle / side of the panel and attached that side too.

The last step is to flip up the panel and ruffle and pin-then-sew the double ruffle seam all the way around the bottom of the cut part of shirt #1. [so the shirt is right side out and right way up while I pin the upside down, inside out ruffle to it.] Eyeball (or measure) where the center of the shirt and ruffle are to pin and then half those distances again for a few in-between pins. I hand-ruffled by scrunching up the fabric as I went on the sewing machine, but you could also ruffle the double ruffle strip (using this simple ruffle tutorial) and then attach it.

Once attached, flip the ruffles down and–voila!–you’re done!!

I love the flat panel front + ruffles the rest of the way around look!

And, of course, the ruffles carry right the way around the back too. As ruffles most definitely should.

Aaaaaaaaaaaand cue my adorable 3-year-old snapping a few “after” pics for me…

I usually get self-conscious when someone is taking my picture…

…But somehow the pressure’s off when that cutie’s behind the lens. [Thanks, Sis!]
So, there you have it. Your closet? Well, go grab your scissors and give it the crazy eye already! Something brilliant could happen, wheeeeeee!


So cute! And great photography!
LikeLike
That turned out super cute! Hmmm… I know I saw some long sleeve t’s on clearance at either Wally-world or Tar-jay recently…
Beckey
http://www.etsy.com/shop/queenbsbusywork
http://reallyreallyrealhousewives.blogspot.com
LikeLike
Pingback: DIY Upcycled Ombre Ruffled Cardigan {from a t-shirt} | CampClem·
Absolutely loved the ruffle t-shirt tutorial. You did a nice job explaining the details. also, you have a great photographer helping you !
LikeLike