
Fantastic news: Big Bro has decided to send out valentines after all… Even though it means including all the girls in his class.
But I know that means no lovey-dovey “be mine” sentiments will do.
Then I remembered seeing this fantastic valentine from last year, and I hoped I’d pinned it.
…And I had! [Click here to see this and all my other Valentine’s pins over on Pinterest.]

But when I traced the image back to its original source, there were no instructions, how to, or easy, free download. *sigh* Oh well, let’s face it, I probably would have made my own anyway!
So I hacked it!
Here are all the steps you need to make your own along with me!

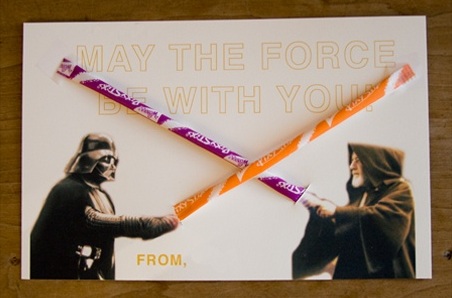
First, google “darth vader obi wan kenobi” and scroll down a bit to find, not just a suitable image, but what looks to be the very same image as the original. Jackpot! [Insert me suppressing the urge to say “the force was with me” on that one.]

Open up and crop the image in Paint. [This program came standard on my bottom-of-the-line Windows 7 laptop, so you probably have it or something like it too.] Then, to isolate just Vader & Obi Wan, use the polygon shape tool with white border (color 1) and fill (color 2) to “cut out” the background. It doesn’t have to be perfect, and you literally just click around the border of what you want to keep, cutting the rest away to white! I did it in sections, so if I messed up, I wouldn’t have to start all the way over.
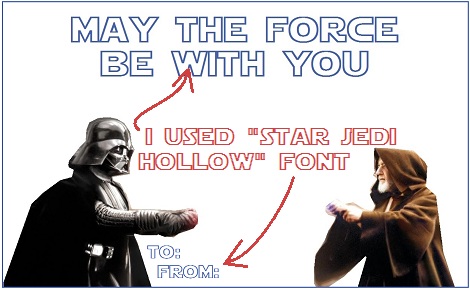
Then, add the text. I used a more Star Wars-esque font than the original, downloaded for free from 1001fonts.com. You can also add a border (not done in the original) as I have here by inserting an unfilled rectangle around your content.
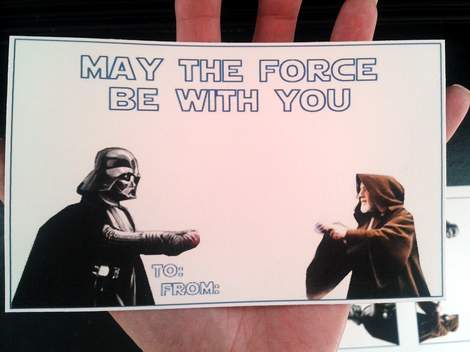
Then print on smooth cardstock & trim! I printed this one first–it’s about 4″ x 6.25″–but it was a little small for the glow sticks. You can easily get two or three to a page, but when deciding print size, take into account the length of your “light sabers” so they are not sticking out from behind your valentine.

Two per page is a good fit for glow bracelets. These are about 5″ x 7.75″ each.
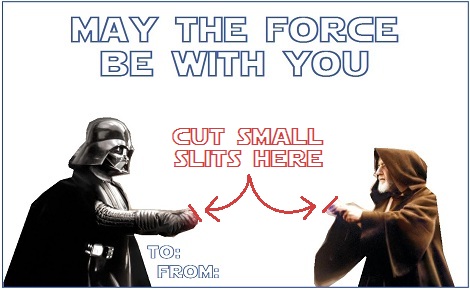
Finally, cut slits in the card to insert “light saber” pixie sticks or not-yet-bent glow bracelets (or even individually wrapped twizzlers might work). [Did you know you can get tubes of 15 glow bracelets at Michael’s for $1?!] Tape the “light sabers” to the back of the card to hold in place.

And shazaam, there you have it! So, anyone else DIYing valentines this year? Do tell!
*
You might like these other valentiney thoughts…


I am!! Did it today while Landon was at school. It is a pictures of him holding out his hand so it will look like he is holding the lollipop (or what ever) and giving it to his friends. Thank it will mean more!
LikeLike
Love that one!!!!!!! Perfect!!!!!
LikeLike
Love it!! Especially to give from a boy to a boy. Tres cool! All over it.
LikeLike
Pingback: Princess Bride Valentines | CampClem·
I found clearanced hand sanitizers with a red carabiner looped through for $0.30. I made a red gift tag (white reinforcement rings around the hole I punched out) and added printed labels: “Share Love – Happy Valentine’s Day!! – Not Germs” on one side and “FROM:” on the other. I cheated and used Avery 5160 labels instead of cutting cardstock and gluing. My son wrote in his name. Relatively simple.
LikeLike
I love that idea!!
LikeLike
Thank you so much for sharing this. I too was disappointed that I couldn’t download the original but yours is just as great! I do not own photoshop, would you please be able to email me one? I’d really appreciate it, my son loves it!!
LikeLike
I wish I could email you a copy, but unfortunately, I cannot for the same reason the original blogger couldn’t: copyright infringement. 😦
But if you don’t have any sort of image editing or paint software, you could just use the uncut image inserted into a Word document with the wording typed over it (see how to insert image and make it a background over here: https://campclem.com/2013/01/24/kids-art-gods-word-keepsake-craft/).
I hope that helps! 🙂
LikeLike
Thanks for the tutorial! My lil guy saw this on Pinterest and this is the ONLY one he wanted! I just made his day…:)
LikeLike
Isn’t it only infringement if you sell it? The creative license commons allows for crafts, commentary, fan art. I need to do this for VDay! Please post! ❤
LikeLike
Pingback: Tinkerbell Valentines: Love, Trust, & “Pixy” {stix} Dust | CampClem·
I had saved this idea to my Valentine’s file, and just wish I would have read your comment on the inchmark blog before I made mine today. It would have saved me so much time with the image search! Thanks!
LikeLike
Pingback: Valentine’s Day Round Up: My Fave Cards & Crafts | CampClem·
Pingback: Valentine’s Day Round Up | CampClem·
Pingback: CampClem Valentine’s Day {in review} | CampClem·
Pingback: Favorite Homemade Valentine’s Day Cards ‹ The Art of Heart & Home·
I’m not sure why you gave detailed instructions on how to do this but did not include any attachments. It was a waste of my time to visit your blog.
LikeLike