
I love a little DIY valentine card action. And even though our eldest is balking at the mere possibility of sending out valentines this year (“Mom, if you take them to school, you can’t just give them to your friends; you have to give them to EVERYONE, like all the girls.”), I’m hoping I can still sneak in some cuteness for the immediate family and Li’l Bro’s classmates.

Here are a few easy DIY valentines we’ve made in the past.

This one’s my favorite. They look so sweet! The boys were wearing pink shirts their aunt had gotten them in honor of their new little sister, but Big Bro put the kabosh on distributing anything in which he is wearing pink, so I changed the photo to black and white. 🙂 The font for the “xoxo” is called Monbijoux, and I downloaded it for free from 1001fonts (I’ve been downloading free fonts from them for years, never with any problems).
To create this card, simply open a Word document and insert the photo, sized to about the size you want the card (about 5″ x 8″ in my case).

To make the photo become a moveable background image over which you can type your “XOXO” or other greeting, click on the image then click >format >text wrapping >behind text. Then you will be able to tweak the placement of your photo and type the text over it. If you want to print two on a page, just set up two columns (>page layout >columns >two), then copy and paste your work to the second column.

For this next valentine, Big Bro wanted to wear a dress shirt and tie… but he didn’t want his face showing. Tricky! So I had him hold a posterboard cut out heart. This font is called Kristen, and it came stock on my laptop & PC.
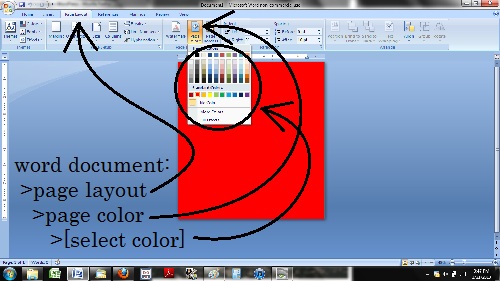
To make your own version, open up a Word document, make the orientation landscape (>page layout >orientation >landscape), make the page red (>page layout >page color >[select color]), then insert the photo (sizing it down to fit about 1/6th of the whole page). If you are printing six to a page, then just make three columns on a your page, and copy & paste the photo & text until you have two per column, three across the top, six on the page. There will be a white edge when you print unless your printer has full-bleed capabilities, so account for that.

For Li’l Bro’s that year, I did pretty much the same set up, but rather than having six valentines per page, I did two trifold cards per page.

So the cover of this card is the heart covering Li’l Bro’s face, then as you unfold it (it’s folded accordian style, so the left third folds to the back and the right third folds to the front), you see him peek and then toss the heart. The cover, or left third, reads “Happy Valentine’s Day,” and the inside back cover, or right third, reads “Love, Li’l Bro.”
Gah! So fun!
TIP: I usually take these cards to FedEx Office, OfficeMax, or Office Depot, etc. to have them printed because these full-color prints eat up printer ink. The trick is to take in your own cardstock (or buy a package there to use), and the price-per-page print is about half of what they charge to print on their stock. The “XOXO” card I had printed on some gaw-geous Neenah linen finish cardstock. The red-background ones were printed on smooth cardstock.

Oh! And if you missed the How To Create A Home Studio In Minutes post, now’s a great time to check it out because that black sheet is the same one used in these Valentine’s photos, shot with the same method! SO easy!
So, anyone else out there love making your own custom valentines? Do tell!
*
You might also want to whip up a few dozen of these as valentines: mint chocolate oreo pops, YUM! Here’s the link…


LOOOOVE YOU! Thanks for the advice on bringing your own paper. Yippee! 1/2 price is always a good thing 🙂 Just finished my boy’s Valentine…can’t wait for you to see. Hee hee.
LikeLike
Pingback: Star Wars Valentine {DIY hack} | CampClem·