
Y’all. Just Y’ALL! I’m so excited to be back in the groove and share this project with you today! Sorry I went incommunicado last week–I’ll share on Wednesday more from that!

But TODAY I want to tell you about this project that–I’m a bit embarrassed to confess–I began back in February! I grabbed a 1/4″ sheet of plywood at the hardware store, well under $20, and set to work!
I had them cut it down from 4′ x 8′ to 4′ x 5’… and I’m sure you’ve unknowingly seen the other 3′ x 4′ piece used several times in other projects as a spray paint “drop cloth.”

I really wanted to keep this completed project–a framed 4′ x 5′ magnetic chalkboard–under $20, so after pricing crown molding at the hardware store, I headed to my local Habitat For Humanity ReStore to see if I could source what I was looking for, and JACKPOT!! ReStore always seems to have some molding, but finding 18′ of the same sort with two lengths each of 4′ and 5′ I thought would prove more challenging that it was. I got just what I needed and then some for $6 total!

I know that rather than mounting the pieces normally (at 45 degree angles), I wanted to lay my crown flat of the chalkboard surface, so I laid it all out and then got to work cutting the mitered corners.

The first cut is easy, but making sure you measure correctly for your inner or outer joint can be a bit tricky. Measure twice… or thrice… then cut!

And seriously, can someone PUH LEASE get this girl a compound miter saw?? ‘Cause it was TEE DEE OUS to cut both ends of all those pieces, and quite the workout.

But if you put in some elbow grease, your mitered cuts should line up just beautifully! [The molding had staples circled on it, which you can see above and which I removed and then painted over, maybe that’s why it was donated to ReStore, but it was not a problem for my project.]

Next, I painted the plywood sheet with magnetic paint. I used a coupon at Michael’s to make it really inexpensive, but this stuff was dreadful to work with, so gloppy.

I muddled through but certainly was not willing to go in for a second coat, whether it ended up being magnetic or not!

An unfortunate side effect of the magnetic paint is that its gloppiness doesn’t go away upon drying.

But no worries! You know my penchant for sandpaper! A quick sanding with a fine grit paper made easy work of the imperfections.

So then it was ready for a little chalk board paint!

There are a bevy of ready made color options to use or mix, not to mention how it would probably take you about thirty seconds on pinterest to find a tutorial for how to make your own.

But we went for classic black. And the upside is that black comes in a spray paint! Easy!

The first coat got good coverage (above), but by the time the second coat dried, I was left with a lovely jet black surface.

And while that dried, I painted the molding frame pieces. [Hey, there’s that remnant piece of plywood again! It’s like Where’s Waldo–now you’re always going to look for it!!] I mixed white and antique white together to cover up the black staple circle marks and to get it about the same shade as the rest of our painted pieces.

Then while those pieces dried, I went back to my chalkboard and completely colored it with chalk to cure it.

For any newly chalked surface, cover with chalk then erase and it’s ready to use!

Next I glued the molding pieces to each other (at the mitered corners) and to the chalkboard.

I thought about nailing too, but skipped it, as the glue really does the work.

A little blue tape to make sure my corners stayed snug and free weights at the corners and in the center of each length, and I left it overnight to dry.

Lastly, I gave the white frame a light sanding. And SHAZAM, one mega magnetic chalkboard at your service, thankyouverymuch.

But now how to get it onto the wall?! I was up to my regular shenanigans when it came time to hang it. I wanted maximum security with minimum wall damage and shifting, so I painted two screws and washers matte black and secured them straight through the chalkboard into two studs. The studs did not fall at perfectly centered spots, so the screws are off center, but they are so camouflaged that you would have a hard time finding them even if you were looking! This method allows my creation to hang snugly and securely against the wall.

I added little felt circles to the back corners and middles, so the wall would not get rubbed or scratched.

I suspended the chalkboard between the backs of two side chairs to step back and do the head tilt thing. Thankfully, that had it pretty perfectly lined up with the window, so I moved ahead. I used a stud finder to locate where my studs were, then screwed in the first screw. Then, supporting some of the weight of the board with one hand, I moved it a little as needed until it was level, sort of rotating on that first screw (the 3′ level was sitting on top) and screwed in the second screw, both straight through to a stud.

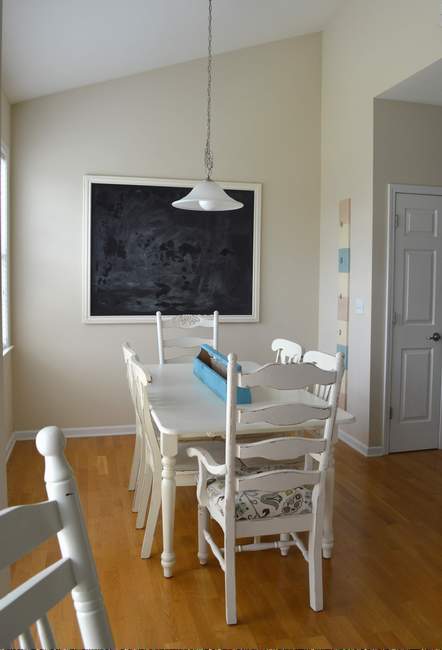
Hello, twenty square feet of happiness hanging there.

I’ll explain the rest of the light fixture on Friday, but–Oh!–between this, the table and chairs, and the oversized ruler height chart, it’s so nice to have this room finally feeling reasonably finished!
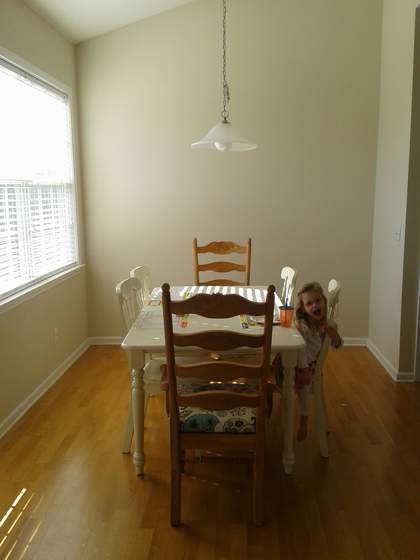
From this…

To this! Just a few simple tweaks are pulling this room together.
It’s been colored on and wiped off several times already.

We plan to draw a big stylized calendar on it, but for now it is quick to find other employment (like for a birthday party this past weekend! Who wants cupcakes?!).

And since the molding is flat rather than at its designed angle, there is a magnificent little lip to keep chalk, HUZZAH!

Surprisingly, having this big black thing on the wall actually seems to make the room look bigger. Maybe it’s because it adds depth to the room or emphasis to the wall height, but either way, I love it! [It’s mottled in this photo, partly wet and partly chalky.]
The total cost for this project was around $25. WHEEEEEEE!

And if you are looking for other jumbo wall goodness, check out my humongous DIY French memo board tutorial!


Gina…you blow my mind! Love it!
LikeLike
Pingback: Holophane Industrial Light Fabulousness | CampClem·
Pingback: Simple DIY Christmas Bunting | CampClem·