
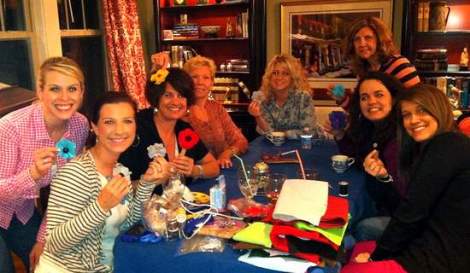
We had a girls’ night last night, and one of the most fun parts of it (at least for crafty me!) was getting in a little craft time with my girlfriends.

Come along with us and make your very own felt flower, wheeee!
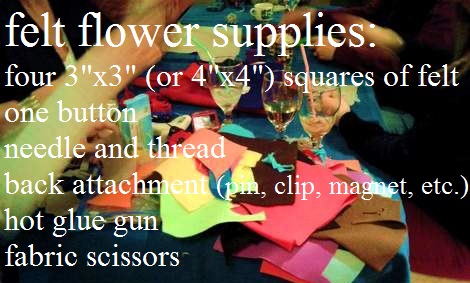
To make your felt flower, you will need four small squares of craft felt (about 3″x3″ or 4″x4″ is great), one button (1/2″ wide or bigger is best), needle and thread, and fabric scissors. [You will also need a glue gun and whatever back attachment you are going to use–like a brooch pin, hair clip, fridge magnet, etc.]

1. You should have four squares (so you will do these steps four times).
2. Fold your square in half.
3. Cut a scallop edge around the three open sides (or don’t fold in half and cut a scallop edge–like a “puffy cloud”–all the way around the four edges.
4. Unfold to reveal your petal. [Repeat for the other three squares until you end up with four “puffy cloud” petals.]
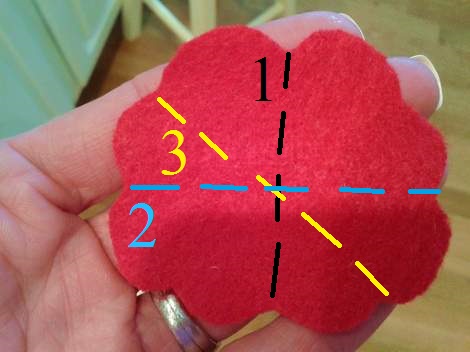
Now fold your petal in half again, but this time do not fold it along the line of symmetry (1), where you folded it in the last photo step, but fold the opposite way (2) or even at a different angle altogether (3).

However you fold it, you want your petals NOT to line up. This will give your finished flower more depth and dimension.

Then, holding your first folded petal, fold and add the second petal under the first at a right angle so half of each petal overlaps.

Next, fold and add the third petal in the same way as the second: under the second so that half of it overlaps half of the third.

And the fourth petal is the only tricky one. This is where the “box-fold” comes in. You know how when you pack a box, but you’re out of tape to seal it, you close all the flaps in clockwise order, then tuck the fourth flap under the first? Same concept!
So add the fourth petal just as you did the second and third, but make sure that the second half of the fourth petal is pulled up to be on top of the first (so half is under the third petal, and half is over the first petal).
Got it? Okay, wheeee! So far, so good!

Next, sew the flower together using your needle and thread. It doesn’t have to be pretty because it will be covered by the button, but do make sure to catch all four inner corners of the flower, criss-crossing two or three times. Also, you may want to choose a thread color that matches or complements your button color.
Once your flower is secure, continue on with the same thread and add your button. Once your button is sewn on, tie off your thread, and your flower is done!

Hooray!! Now… what to do with it?!
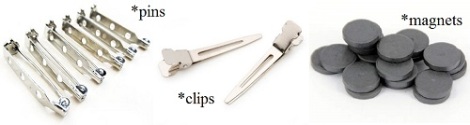
You could add a pin, clip, or magnet to the back of it with a bit of hot glue.
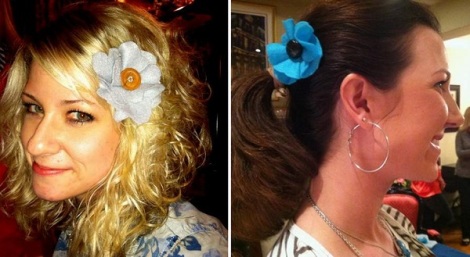
The clips are my favorite (I scored a 100-count box for around $5 or 6 bucks at Sally Beauty Supply)–they can be clipped to a shirt pocket, blazer lapel, side swept bang, pony tail (for a little girl… or a mommy!), etc… Add a magnet and flower up the fridge, a garden pail, or a filing cabinet… Or add a pin to flower up a hat, shirt, coat, or cardi…
You could also glue a flower to the top of a popsicle stick and stick it in a houseplant to add color… Or you could glue one onto a clothespin and then in turn clip the clothespin to a gift bag to pretty up the gift and hold the card… Sew one to a ponytail holder… Or glue to a felt covered section of toilet paper roll for a pretty craftsy napkin ring… Add some ribbons to the back to make a bookmark… The possibilities go on and on!

Yay! So fun!! I loved to see all the color/button combinations friends come up with! So pretty!
And a beautiful reminder of the creativity God knits into even the least crafty of us! Wheeeeeee!


Totally CUTE! Y’all look like you’re havin’ SO MUCH FUN! :~) Thanks for posting this idea…LOVE! :~)
LikeLike
I think it might have been akin to torture for some of my less-crafty friends, but they were VERY GOOD SPORTS! 😉
LikeLike
Pingback: Hex Nut Bracelets {my take & tweaks} | CampClem·
Gina, as I was reading I was thinking you could attach them to a clothespin and then I saw you suggested it. My thought was to put it on a picture board. I see another craft post coming from you now! It would really jazz a board up. The magnets could be for the board. Do you know the ones I’m referring to? Creative Memories makes one.
LikeLike
http://www.ebay.com/itm/Creative-Memories-Black-Mini-Everyday-Display-w-magnets-clothespins-knob-/330887965916?pt=LH_DefaultDomain_0&hash=item4d0a75acdc
LikeLike
Cute idea! I already have my MONDO french memo board (https://campclem.com/2012/07/12/easy-humongous-diy-french-memo-board-on-the-cheap/), but this would be a very cute little note station!
LikeLike
Pingback: A {total sweet spot} Week In The Life At CampClem | CampClem·
Pingback: Another Neighborhood Crafty Party {and a disaster averted} | CampClem·
Pingback: Super-Cheap Owl Jewelry DIY {& crafting with MOPS} | CampClem·
Hi there – Very cute flowers!! One quick question – why sew and not hot glue gun? Do you think either way would work the same? I’ll have to try these. Thanks and have a nice day!
LikeLike