
Spring finally looks like it is making an appearance around here! In the 70’s this week, and we are relishing it!

So, inspired by the warming weather, I pulled out this stack of 4″ x 4″ fabric squares I had in my stash.

Then I set to the work of arranging (and rearranging) the pieces over and over again to visually brainstorm what to make. I landed on a nice twirly knot dress. So I figured how many pieces I would need for each tier, but I did not have enough squares to make my bottom tier wide (and therefore ruffled) enough. But, the joy of limitations kicked in, and I decided to add a funky green fabric in for about a quarter of the bottom tier, similar to the last twirly knot dress I made.

So the trick with making a simple patchwork is to sew all the pieces in one row together and then sewing the rows together after that. So I had four rows of patchwork to sew, two for the top tier and two for the bottom. Just sew two squares right sides together, and repeat… ad nauseum.

Once you have two completed rows, you can sew them together, just sew right sides together along a long edge.

So once I had my two tiers sewn (including the green fabric added onto the end of the bottom tier), I sewed the ends together on each, making tow tubes (one top tier tube and one bottom). Then I settled on trims.

I added an aqua microcord ruffle to the bottom of the bottom tier.

So the hot pink ric-rac and aqua trim added nice details for me.

Ahh! But then it was on to buttons! Which to choose, which to choose?! I had the size I wanted but not the colors… And the colors I wanted, but too small…

So I did what any crazed crafter would do: I made my own fabric covered buttons, hurrah!!
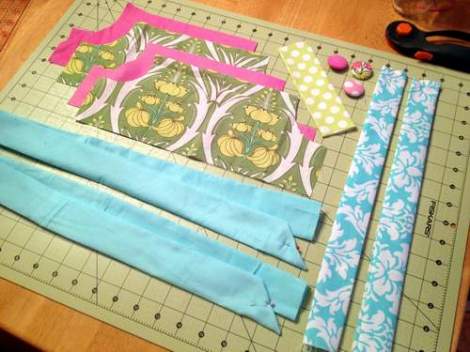
With the skirt pieces done, I moved on to the bodice. The aqua pieces are the waist ties; the aqua pattern pieces are the shoulder straps; the green and pink pieces are the bodice & liner pieces; the polka dot fabric is a detail for the bodice; and the buttons will layer on top of the polka dot fabric.

To make the shoulder and waist straps, I folded the raw end of the fabric under, folded under the corners, then folded the sides in towards the center. I just pinned at the end to hold in place and scored the rest of the side seams with my fingernail. [The pointed ends of the waist tie pieces were formed by folding in towards the center and then folding in the corners.]

I assembled my bodice just like I did for the knot top, sewing on the green polka dot detail before attaching the bodice to the liner, and tucking in the waist straps before sewing the front bodice piece to the back bodice piece.

Then it was time to pull it all together! I pinned the bottom ruffle to the top in about eight places, pinning the center point of the front, back, and sides of the larger bottom tier to the front, back, and sides of the top tier. As I attached the two pieces, I finger ruffled (scrunched) the fabric of the bottom tier as I sewed it to the top.

Then I pinned and sewed the top tier to the liner of the bodice. [That way I can focus on ruffling in one step and finishing the front in the next.] Next I folded the raw edge of the bodice under and pinned it to the top tier & bodice liner layer (so the skirt is sandwiched in between the bodice and liner.]

Then I top sewed around the bodice where it meets the skirt for detail and attached the buttons.

Oh and y’all. It is so delicious.

Shazaam!

And now? A montage of twirly, patchwork, bright, Spring-ready, ruffled cuteness…


[And don’t forget to TWIRL!!]


Okay, so we are ready for spring, wheeee!


This is absolutely adorable! Great job!
LikeLike
This is to darling for words!!! Lovely work, Gina. Makes me think of Holly Hobbie and makes me want to get out my stash of fabric too!
LikeLike
Ooops! “*Too* darling for words.”
LikeLike
Pingback: Every Day A Celebration: Patchwork Package | CampClem·
Pingback: Sis’s Upcycled “T-Shirt Quilt” Twirly Dress {tutorial} | CampClem·
Pingback: Heather Bailey Creative Challenge & Giveaway: Project 2 | CampClem·
I would like to make this for my daughter in a size 8. How many rows should I be doing? I generally like the dresses I make to go just below her knee caps. Do you have a pattern for the bodice? I have lots of dress patterns/ do I just hybrid it?
LikeLike